
In order to understand Spring WebFlux more deeply we will implement a simple REST end-point for User. This User end-point as of now will have following REST action.
| HTTP Method | URI | Response |
| GET | /v1/users | UserResposne |
Creating Spring Boot WebFlux Application
So first we will have to create Spring WebFlux application. Its simple to stat with , just go here and fill up Project metadata and in dependencies use Spring Reactive Web. This will generate a folder with requires pom.xml and other Spring WebFlux dependencies . Once you download it , extract and import it in your favourite IDE . Make sure the pom.xml file has following dependency .
<dependency>
   <groupId>org.springframework.boot</groupId>
   <artifactId>spring-boot-starter-webflux</artifactId>
</dependency>
Creating REST Controller
All is set up for us to create Controller . But before writing controller code directly , let’s just first take a moment and understand what are the information we are going to need to implement the controller . So we already know few things , and these are
- We need REST End Point for Users
- We have to use HTTP GET Method
- We Know Path/URI for this HTTP GET Method
- We Know what to send in Response.
Now we need to implement above functionality in Spring WebFlux application, Spring provides annotation for all of the above requirement , we just have to implement it in correct way. So here are those annotation in Spring Reactive Web Provides
- @RestController for REST End Point for Users
- @GetMapping for HTTP GET Method
- @RequestMapping for Path/URI for this HTTP GET Method
- @ResponseBody to send in Response.
Lest understand what each of this annotation do.
@RestController
@RestController is composed annotation. It is composed of @Controller and @ResponseBody annotations. @Controller defines bean as controller whereas @ResponseBody indicates that every method this bean writes directly to the response body . The @RestController annotation is applied at the top of the class .
@GetMapping
@GetMapping annotation is type of request mapping annotation that gets invoked when GET HTTP method is called . We can also use @RequestMapping annotation here like this
@RequestMapping(method = RequestMethod.GET)
@RequestMapping
@RequestMapping annotation maps the incoming request for the given URI to the particular endpoint . In our case we need to point all the request (irrespective of HTTP Method) to our controller , so we will declare this annotation at top of the Controller class mentioning the URI.
@RequestMapping(USER_API_V1+SLASH+USERS)
where values in parenthesis is the URI in our case it is “/v1/users” indicating its version-1 of the API with endpoint “users”. The same @RequestMapping annotation can also be used along with HTTP method above functions to define the routing as mentioned above.
@ResposneBody
@ResposneBody annotation adds the return type of the method where it is declared to the repose body of the request. It is defined at the top of controller methods. In Simple word if the method is returning String , then response of that endpoint will be String.
With above annotations knowledge lets create a controller with String as @ResposneBody.
@RestController
@RequestMapping(USER_API_V1+SLASH+USERS)
public class UserController {
  @GetMapping
  public String getValue(){
    return "Hello World";
  }
}
If you run the Spring application with above controller we will get response in browser for GET HTTP call on http://localhost:8080/v1/users as “Hello World” .
Till now its exactly similar to how we do it in Spring MVC/Boot and we have not yet used any of the WebFlux feature, in order to use it , lets enhance the application and add Service layer for User and return UserResponse object.
@Service
public class UserServiceImpl implements UserService {
  @Override
  public Flux<UserResponse> getAllUsers() {
    return Flux.fromIterable(generateUsers());
  }

  private List<UserResponse> generateUsers() {
    return Arrays.asList(UserResponse.builder()
            .userId(1)
            .userName("User-1")
            .build(),
        UserResponse.builder()
            .userId(2)
            .userName("User-3")
            .build(),
        UserResponse.builder()
            .userId(3)
            .userName("User-3")
            .build(),
        UserResponse.builder()
            .userId(4)
            .userName("User-4")
            .build());
  }
}
Flux and Mono in Reactive Spring
As you can see we have UserServiceImpl class which has getAllUsers() method that Returns Flux<UserResposne>. Since we are returning the more than 1 entity in response we will have to use the Flux of that entity.
There are 2 Types of Publisher in Spring , Mono and Flux. Mono is a Publisher that produces 0 to 1 value . Flux is publisher that produces 0 to N values. As of now just keep in mind that we want to return more than 1 UserResposne entity we are using Flux. When we will use endpoint to get single entity of UserResposne that time we will use Mono. More on Flux and Mono in upcoming post.
Final Controller Code
@RestController
@RequestMapping(USER_API_V1+SLASH+USERS)
public class UserController {
  @Autowired
  private UserService userService;

  @GetMapping
  public Flux<UserResponse> getValue(){
    return userService.getAllUsers();
  }
}
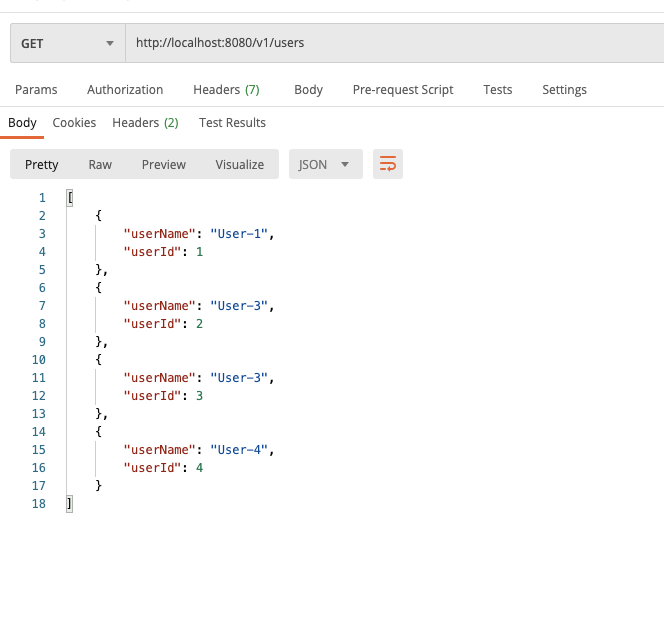
When you run this application using postman with url http://localhost:8080/v1/users the you should see the following response
Now we are done with first part of Spring WebFlux tutorial. There are lot more things to learn and things are getting super exited, we have just started.
The Code for above you can find it here at GitHub.
Thank You 🙏