Akka Streams – Part 2 – Scan, Zip, ZipWith Operations

In our last blog post here we saw what are Akka stream , how they are initiated, what is Source etc. a very basic introduction. In this post we will go further ahead and check what are some basic operations we can do with stream flow.

Scan Operation

Scan operation can be used to performa user specific operation over the stream of Integers who’s sequence we defined in Source

public Source<Integer, NotUsed> getIntegerRangeSource(){
return Source.range(1, 10);
}

The Scan operation over Source takes 2 arguments first is the initial value of the operation or computation we want to perform and second is function. This function takes 2 arguments first is accumulator which we will carry forward to next operation , second is next element from our stream and function that performs the computation. Who’s result is added to accumulator. Syntax for this is

public <T> Source<T, Mat> scan(final T zero, final Function2<T, Out, T> f)

Here is the Example to perform the addition operation over all the elements from the Source Stream.

Source<BigInteger, NotUsed> addition = source.scan(BigInteger.ZERO,
        (accumulator, next) -> acc.add(BigInteger.valueOf(next)));

.scan() function takes BigInt Zero as first argument and function tat performs addition of the 2 integers.

How Computation happens here.

The Source stream is from 1 to 10 . The initial value of the Scan Operation is 0 (zero). So on the first function call would have output

0(accumulator) + 1(next) -> 1 (assigned to accumulator)

Since this is stream operation the Next value would be 2 and accumulator value is already 1 so the result would be 3 which is assigned to accumulator. In this way the remaining operations are as follows

1(accumulator) + 2(next) -> 3(assigned to accumulator)
3(accumulator) + 3(next) -> 6(assigned to accumulator)
6(accumulator) + 4(next) -> 10(assigned to accumulator)
10(accumulator) + 5(next) -> 15(assigned to accumulator)

In this way the computation will continue till the Source Stream reached its end at 10.

Of Course as this is Stream operation we will have to to use runWith() to sink the stream , and we can use map() to print our results in sequence.

public void addingStreamValues() {
    Source<Integer, NotUsed> source = getIntegerRangeSource();
    Source<BigInteger, NotUsed> addition = source.scan(BigInteger.ZERO,
            (accumulator, next) -> accumulator.add(BigInteger.valueOf(next)));
    addition
            .map(val -> {
                System.out.println(val);
                return val;
            })
            .runWith(Sink.seq(), actorSystem);
}

Factorial in Akka Streams Using Scan Operation

As we have seen in previous example the the addition of the numbers is performed using only one initial value which is 0 and all the elements of the stream. Now Instead of doing addition if we perform multiplication that would be factorial operation. Now only difference is instead of keeping initial accumulator value as 0 we will keep it 1 .

public void factorialInStream() {
Source<Integer, NotUsed> source = getIntegerRangeSource();
Source<BigInteger, NotUsed> multiplication = source
.take(5)
.scan(BigInteger.ONE,
(accumulator, next) -> accumulator.multiply(BigInteger.valueOf(next)));

multiplication
.map(val -> {
System.out.println(val);
return val;
})
.runWith(Sink.seq(), actorSystem);
}

Here we have taken only first 5 elements from the Source Stream and perform operations on those only and result is printed.

Zip Operation

Zip operation is used to combine two Streams using Pair. Consider we have 2 Streams one is from Range 1 to 10 and another is of Range 11 to 20 . The Zip operation will perform on Source 1 and Source 2 will result into Pairing Each element from each Stream to another like this.

public void zipOperation(){
    Source<Integer, NotUsed> source = getIntegerRangeSource();
    Source<Integer, NotUsed> source2 = getIntegerRangeSource2();
    source
            .zip(source2)
            .map(val -> {
               System.out.println(val);
               return val;
            })
            .runWith(Sink.seq(), actorSystem);

}

Output of the above code is

Pair(1,11)
Pair(2,12)
Pair(3,13)
Pair(4,14)
Pair(5,15)
Pair(6,16)
Pair(7,17)
Pair(8,18)
Pair(9,19)
Pair(10,20)

The Pair Object is from Akka Actor library , and each element from this Zip operation can be accessed using this Pair object.

One thing to notice here this operation will be performed only till the number of elements from both streams are equal , that means if the source 2 has 15 elements then for remaining 5 elements which does not pair with source 1 will be skipped as source 1 has only 10 elements.
If you want to perform Zip operation even if the stream elements wont match then use ZipAll function like below

public void zipAllOperation(){
Source<Integer, NotUsed> source = getIntegerRangeSource();
Source<Integer, NotUsed> source2 = getIntegerRangeSource2();

source
.zipAll(source2, -1 , 0)
.map(val -> {
val.first();
System.out.println(val);
return val;})
.runWith(Sink.seq(), actorSystem);

}

output will be

Pair(1,11)
Pair(2,12)
Pair(3,13)
Pair(4,14)
Pair(5,15)
Pair(6,16)
Pair(7,17)
Pair(8,18)
Pair(9,19)
Pair(10,20)
Pair(-1,21)
Pair(-1,22)
Pair(-1,23)
Pair(-1,24)
Pair(-1,25)

Here you can see when source 1 does not match with any element it prints as -1 which we have given in

.zipAll(source2, -1 , 0)

ZipWith Operation

ZipWith function is used to combine 2 streams with function that performs operations on this elements.

public void zipWithOperation(){
Source<Integer, NotUsed> source = getIntegerRangeSource();
Source<Integer, NotUsed> source2 = getIntegerRangeSource2();

source
.zipWith(source2, (elem1, elem2) -> elem1*elem2)
.map(val -> {
System.out.println(val);
return val;})
.runWith(Sink.seq(), actorSystem);

}

Here is above code sample we have performed ZipWith using multiplication operation. Please note in this case as well just like Zip function the elements that does not have any corresponding element in another stream wont be called.

Conclusion

In this blog post we saw some more useful operations that we can do using akka streams also we saw one simple use case of calculating Factorial using the Akka Stream. You can check all code form this blog alone here on github.

Introduction To Akka Streams – Part 1

Akka is powerful open source library that helps you to develop distributed application which are fault tolerant and highly concurrent. Akka Streams is implementation of Reactive Streams specification which helps you to develop application that requires stream consumption.

Why Application need Stream Processing

In todays modern application development , stream consumption is one of the most important way to consume data , whether its stream of video coming from OTT platform to your device or in some cases your mobile scroll events going from end-user to server. All these are examples of stream of data flowing from one end to another. In such cases Stream processing becomes highly important. Moreover in todays micro-service based cloud application development micro-services not just rely on REST based communication but also events streams and data streams are common communication medium.

Akka Streams

Akka Streams which are built on top of popular Akka Actors library is one the most popular Stream processing library. A Stream can be visualised as a process that includes transforming and operating on continuous flow of data . Now the Source of this data can be anything a simple array , or File System or in most cases the Stream is coming from the streaming service like Kinesis or Kafka.

Akka Stream Concepts

In this post we will look into only linear processing in akka streams . Later in this series we will explore graph based stream topology.To Start with basic elements of the Akka Streams are Source, Sink and Flow . You can imagine Source as name suggest from where the stream initialise. Akka Stream API provides number of way to initialise source something like this.

Source<Integer, NotUsed> source = Source.range(1, 10);

This represents a Source of Integer stream. This stream can be run using method runForEach which will call a Producer lambda for each value of the stream data.

source.runForeach(i -> System.out.println(i),  actorSystem)

In above we have to also provide the actorSystem object in order to run this stream. Putting it all to gather we have

public void runBasicAkkaStream(){
        runningForEachElement(getIntegerRangeSource())
                .thenRun(() -> System.out.print("Stream Consumed"));
}

public CompletionStage<Void> runningForEachElement(Source<Integer,NotUsed> source){
  return source.runForeach(System.out::println,  actorSystem)                .thenRun(() -> actorSystem.terminate());}

public Source<Integer, NotUsed> getIntegerRangeSource(){
    return Source.range(1, 10);
}

Executing this code will will print the values in the stream from 1 to 10. There are number of operations that you can do as well. The important thing to notice here is the Source can be reusable , you can have another operations on this source and consume it .

These was just an introduction to Akka Streams we will explore more in upcoming post . You can check the code on github

Postgres Database and PG Admin using Docker Compose

Docker makes all development things really easy. Just one line command and you are up with whatever you want (of course if it’s available as docker Image 😉).

Gone are those days when you have to spend hour or so to setup just a simple database on you local development environment , worrying about process , ports etc. Docker makes it really easy for you . In this article we will use a simple docker compose file to setup the PostgreSQL data base as well as PG Admin.

Here is the docker compose file to set it up. Save this code as docker-compose.yaml

version: "3"
services:
  db:
    container_name: my-pg-db
    image: postgres:13.4-buster
    restart: always
    environment:
      POSTGRES_USER: pguser
      POSTGRES_PASSWORD: pgpassword
      POSTGRES_DB: mydatabase
    ports:
      - "5432:5432"
    volumes:  # Persist the db data
      - database-data:/var/lib/postgresql/data
  pgadmin:
    container_name: my-pgadmin
    image: dpage/pgadmin4
    restart: always
    environment:
      PGADMIN_DEFAULT_EMAIL: mypg@example.com
      PGADMIN_DEFAULT_PASSWORD: Hello123
    ports:
      - "9080:80"
volumes:
  database-data:

To run this docker container go to the folder in which it is saved and type the following command

$ docker-compose up

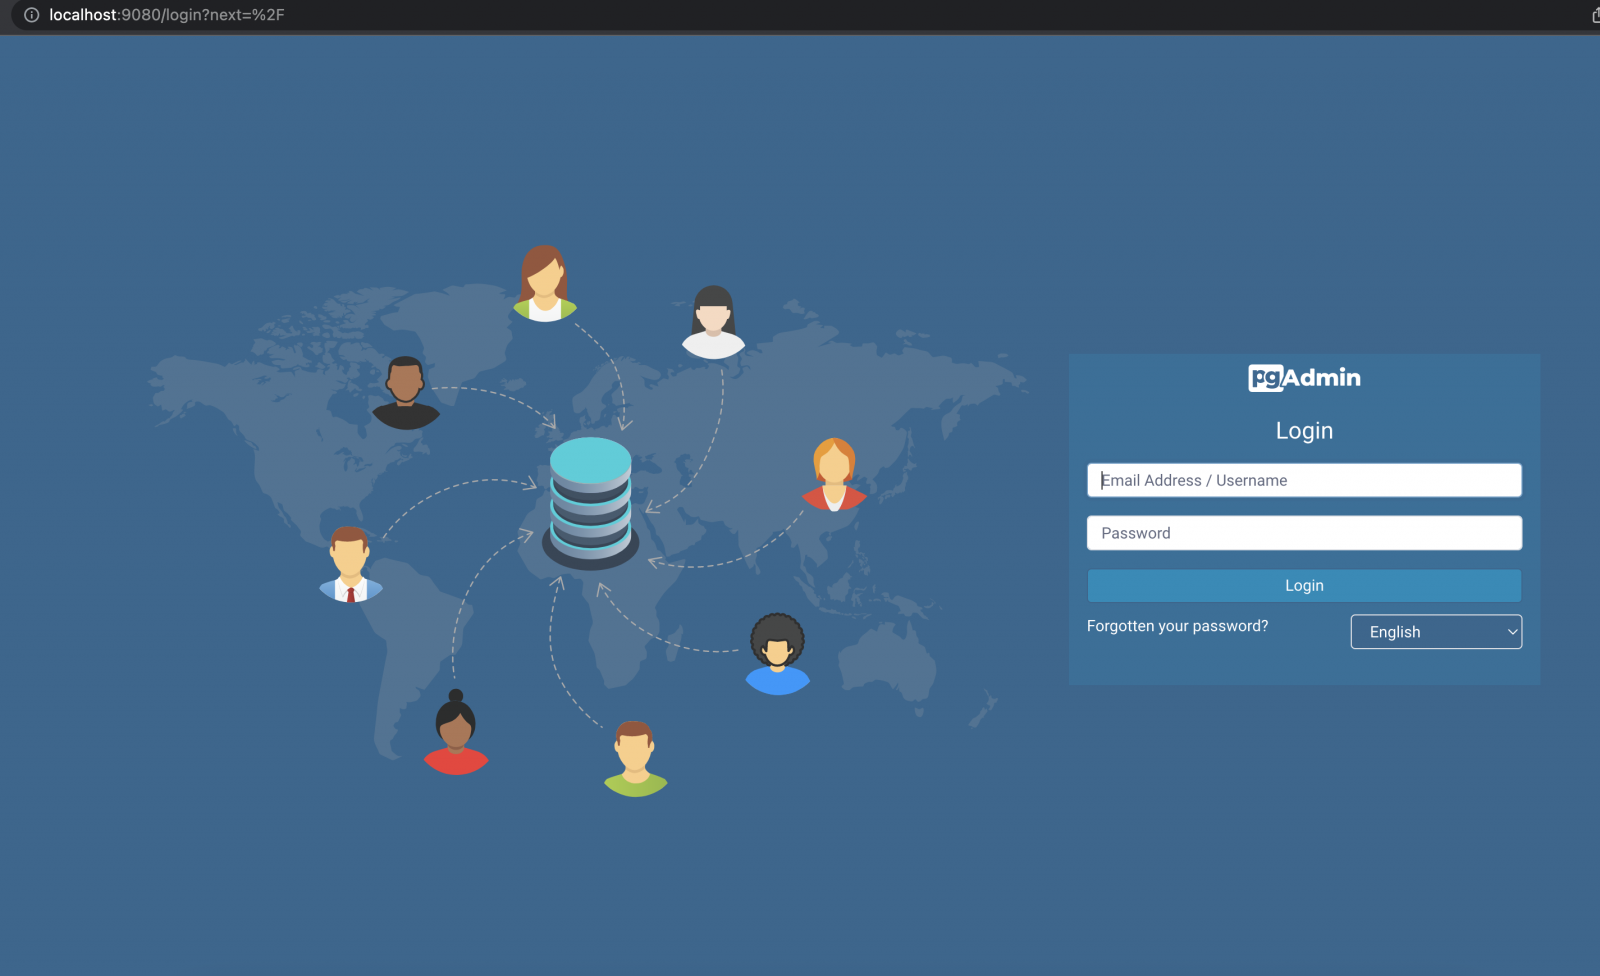
The above command will run 2 docker containers , one is postgres db container my-pg-db and other one is PG Admin container my-pgadmin. You can check these with docker ps command . Now as the PG Admin container is running at port 9080 got to http://localhost:9080 , you should see page like this.

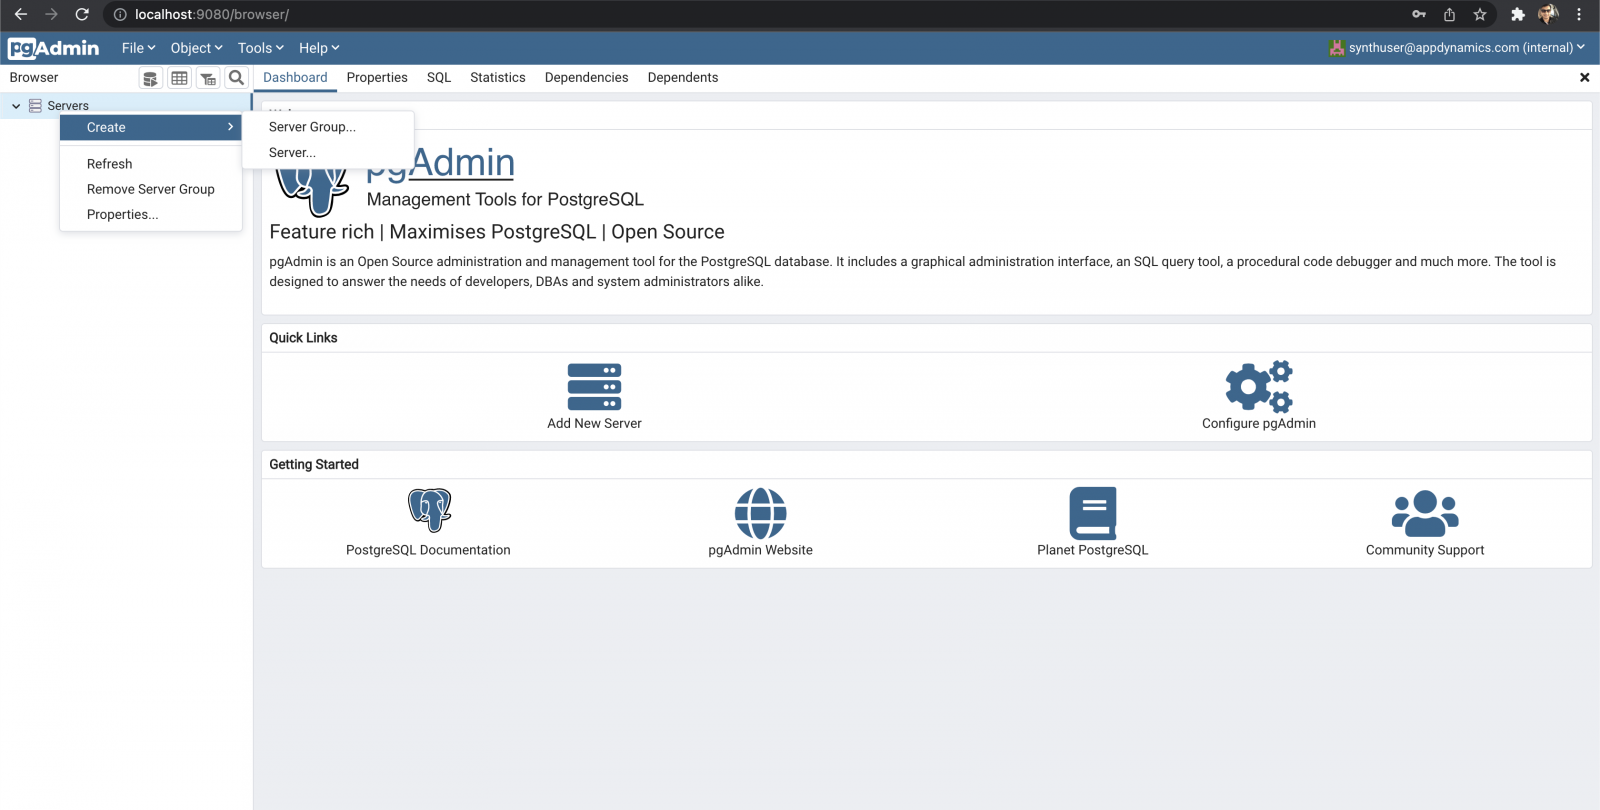
Here you have to login with credentials given in my-pgadmin container . One login you will have to add server from left side

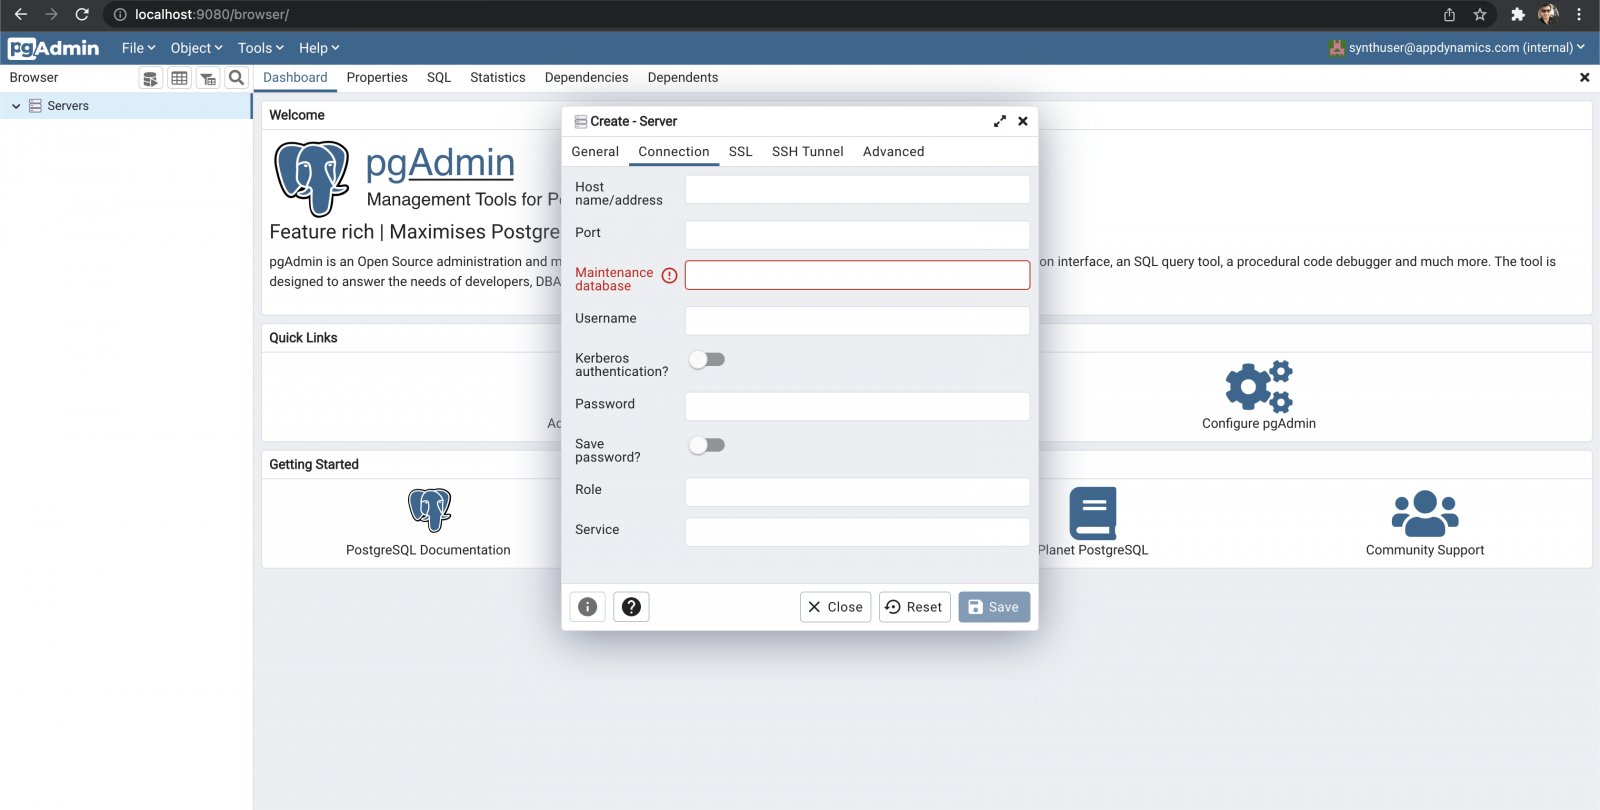
In create Server page , in general section provide any name

In Connection Tab as shown you will have to provide IP address of the my-pg-db container.

to get IP address of the container , type below command

$ docker inspect <CONTAINER_ID_OF_my-pg-db> | grep IPAddress

the IP address returned by this command should be used at Host Name/address field .
Other fileds are similar to environment variables provided to my-pg-db in you docker-compose.yaml file. Click on save and you will see the database listed in you server.

To access this database from your development environment just use IP as localhost and port as mention in docker file (int this case 53432)

for example your JDBC url should look like for postgres database

jdbc:postgresql://localhost:5432/postgres

That’s it , it is as simple as that .

India & Emerging Unicorns !

नमस्कार 🙏

2021 marks the most successful year for the startups in India. In one year alone India witnessed exponential rise in the number of startups reaching Unicorn milestone, to be precise 33 new unicorns .

What does this mean for Indian Startups and India ?

This number pushed Indian startup unicorn ranking from 4th to 3rd place in global unicorn race. India is now 3rd in place leaving behind UK and just below USA and China. However if you see the numbers, India is still behind these two nations, USA 254 unicorns and China with 74[1] adding in year 2021.

Even though Indian unicorn number is not large, when compared to the global leaders in unicorns, it is quite significant for the Indian startup ecosystem.

The new unicorns in this year, ranging from variety of sectors including first ever unicorn in E-pharma (Pharm Easy) , first Health Tech unicorn (Innovaccer) and first social commerce unicorn (Meesho) not to forget multiple startups and unicorns in FinTech, On Demand Delivery and E-commerce sectors. Not only this Indians are now leading 119 Unicorns all over the world with 54 of them in India.

India has always been centre for number of multinational companies to open up their offshore development centre , Research & Development centre , outsourcing etc. However homegrown startup ecosystem has been a big leap ahead, young graduates can now not only look for big brand to work with but working on a startup is also new and exiting opportunity & with success stories like unicorn OYO Rooms founded by 24 years old Ritesh Agarwal and story of Zerodha founded by Nithin Kamath a Leading stock brokerage firm in India, Entrepreneurship is a viable option and no longer a distant dream at 50 something.

Indian television programs these days are filled with advertisements of successful startups be it digital payment app Like PhonePe, PayTM or On Demand delivery apps like Swiggy, Zomato. Not only these but there are multiple startups heading to become unicorn and whats the most exiting about them that they are being quickly adapted by consumers and you can see those not just in Television advertisements but also in IPO’s. Zomato being one of the most overbought IPO of recent time. Of course not all business models are Investor/Traders’s favourite (they see it through 😉) and stock market is different creature all together however the IPO listing can be considered as first step for any startup heading towards an enterprise.

The leading factor in this growth

There are multiple factors that triggered this growth. One of the most important factor is adaption of smart phones by majority of the population leading to larger user base for any App startup. Other factor is digital first business model, be it On Demand delivery of the food, medicines or Shopping products online.

One of the trigger point, I think, that boosts to digital payments is Demonetization decision taken by Government of India . Yes, its economical benefits are still debatable , yes it is still being criticised or praised depending upon the view, however knowingly or unknowingly it has given a much needed push for digital payments as it was one of the easiest way for the payments during demonetization period. This has increased the user base for many digital payment apps. Five years, and now in 2021 India is witnessing worlds largest digital payment with over 3.65 billion transaction[2] this year alone.

The Road Ahead

Right from startup till being an unicorn, the journey is tough. I usually compare it with climbing 🧗🏻‍♀️ a mountain and that too not any mountain but climbing Mount Everest 🏔. Many dream of it, many train for it, few has courage to kickstart this journey (as full time or part time), some quickly give up, some push ahead of base camp 🙂(timely execution & get up to Series C funding) and finally only courageous one reaches the top 🦄.

As of now, we are just counting the private startups becoming an unicorn however there is a much bigger picture when it comes to technology or digitalization to look at. Each and every sector/business is now becoming digital and going online.

How can a government be behind? It is not, rather it is leading this sector. One of the best example is National Payments Corporation of India who developed the Unified Payments Interface  and now its playing major role in instant digital payments. Many government schemes/facilities are available online be it Railway Reservation or Passport application or filing your Income Tax return improving every year in its features and ease of use. Bringing all such facilities provided right from central government till the gram panchayat could be the largest ever digital transformation and would defiantly need lot of talent pool and therefore creating multiple opportunities.

No one can predict a definite growth however one thing is for sure, India has the right ingredients (talent pool , needed education system & encouraging/success stories) to move ahead, grow at much faster rate in terms of not only creating Unicorns but large enterprise that could shape the future, who knows the next Google, Apple or Netflix could be from India as well .

Reference

[1] Article-1

[2] Article-2

Spring WebFlux Reactive Repository using R2DBC – PART-4

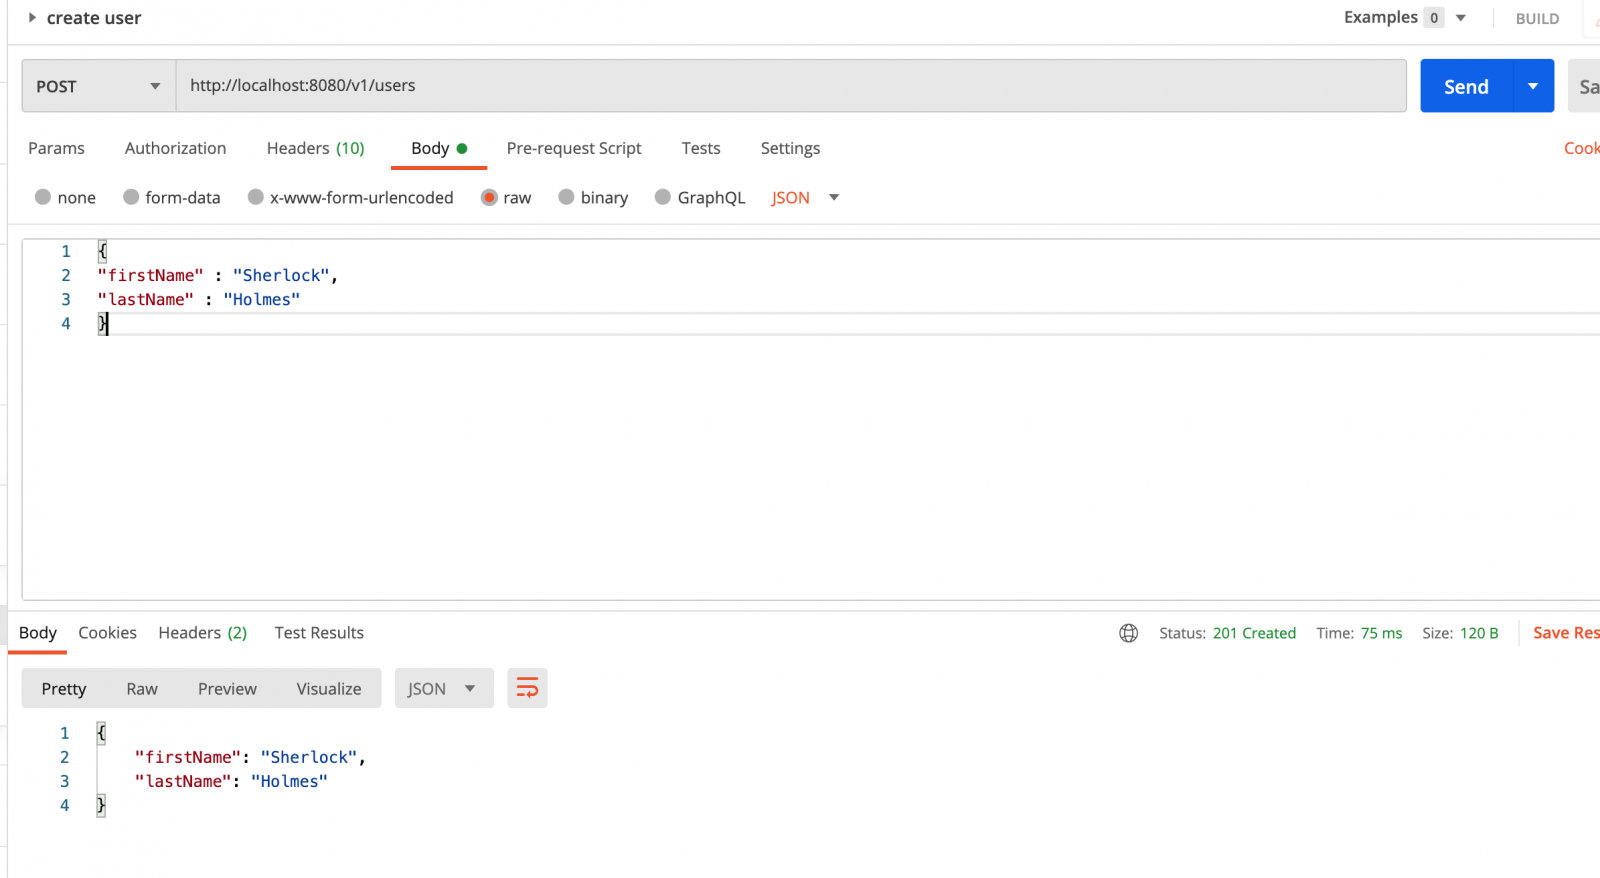
In this section we will create a POST request to user controller to create new User in our Data Base. We will now use new Connection Factory method to crate ConnectionFactory instance. Like below

@Bean
public ConnectionFactory connectionFactory() {
  return MySqlConnectionFactory.from(MySqlConnectionConfiguration.builder()
      .host("localhost")
      .port(3306)
      .username("root")
      .password("")
      .database("ExampleDB")
      .build());
}

In above code snippet we have created instance of ConnectionFactory from MySqlConnectionFactory class .

Creating Request Object

We will create a UserSaveRequest class which will match our JSON POST Request Object so that the incoming JOSN data we get as an object in our controller.

@Data
@AllArgsConstructor
@NoArgsConstructor
@Builder
public class UserSaveRequest {
private String firstName;
private String lastName;

}

Controller Changes for new POST Method

Add a @PostMapping to UserController class as below.

@PostMapping
@ResponseStatus(HttpStatus.CREATED)
public Mono<UserSaveRequest> add(@RequestBody UserSaveRequest userSaveRequest) {
return userService.saveUser(userSaveRequest);
}

Using Repository Default Method

We will use inbuilt save method of ReactiveCrudRepository to save our User Object. This save method has signature as below

<S extends T> Mono<S> save(S var1);

We don’t have to do anything other than passing an object of User class created from incoming request to this method. It will save that object into the data base.

Modifying UserService

Add the save method in UserService interface and implementation in UserServiceImpl class . This method is simple it will take the object of UserSaverRquest and create new Object of User from it and then call save method of Repository.

public interface UserService {

Flux<UserResponse> getAllUsers();

Flux<User> findUserByFirstName(String firstName);

Mono<UserSaveRequest> saveUser(UserSaveRequest userSaveRequest);

}
@Override
public Mono<UserSaveRequest> saveUser(UserSaveRequest userSaveRequest) {
User user = new User();
user.setFirstName(userSaveRequest.getFirstName());
user.setLastName(userSaveRequest.getLastName());
return userRepository.save(user)
.thenReturn(userSaveRequest)
.doOnError(e -> {
if(e != null) {
throw new RuntimeException("Exception occurred during data base operation");
}
});
}

userRepository() method will save the object to Data base. the .thenReturn() method will get called when Mono is completed successfully and return the same UserSaveRequest object as we are not exposing any of the primary keys of data base to the client of the api. The .doOnError() will throw a RuntimeException if there some error while saving it to data base.

Response From API Call

User create API call

You can check the code commit for this changes here

Spring WebFlux Reactive Repository using R2DBC – PART-3

Continuing the Spring WeFlux series , here now we will cover the Reactive Repository. Here is the link for Part-2 where we have covered the controller part.

Why we need Reactive Repository

All the database calls using JDBC drivers are blocking in nature. That means a thread that calls the database wait until the database return any result or timeouts. So this is huge waste of the resource , thread which is just waiting ideally can be used for better purpose . So what are the different solutions for this problem ? There can be number of solutions but we will discuss below two and implement only one .

  1. Using CompletableFuture and ThreadPool
  2. Using Reactive Relational Database Connectivity  (R2DBC) .

CompletableFuture and ThreadPool

This way of executing database query is not a non-blocking way but it separates the blocking query into different execution context. Here we can create a Thread Pool and use that pool with CompletableFuture to execute database query something like this.

Executor executor = Executors.newFixedThreadPool(10);
CompletableFuture future = CompletableFuture.supplyAsync(() -> {
    String sql = "SELECT * FROM users";
    ResultSet rs = stmt.executeQuery(sql);
    //iterate over result set and return result
    User user = new User();
    while(rs.next()){
      user.setName(rs.getString("name"));
      user.setId(rs.getInt("id"));
    }
     return user;
}, executor);

Using Reactive Relational Database Connectivity  (R2DBC)

R2DBC is a project that enables us to use the reactive programming API to connect to Relational Database. Until now it is not possible to use JDBC as those are blocking API’s. We can use the R2DBC project along with Spring data to talk to Relational Database. We are continuing example for last post and now we will add this R2DBC project , but for that we will have to add the following dependencies.

Spring Boot Data R2DBC

<dependency>
    <groupId>org.springframework.boot</groupId>
    <artifactId>spring-boot-starter-data-r2dbc</artifactId>
</dependency>

R2DBC MySql Driver

<dependency>
<groupId>dev.miku</groupId>
<artifactId>r2dbc-mysql</artifactId>
<version>0.8.2.RELEASE</version>
</dependency>

By adding above dependency we have all that we need to use the reactive API to access the relational database . In this case we are using R2DBC and Spring Data R2DBC

Data Base Configuration

For R2DBC to work we will have to add certain configuration , fo this we will add a DataBaseConfiguration class that creates a Spring Bean of ConnectionFactory this bean will have r2dbc connection url , data base name etc. We will create this Configuration class by extending AbstractR2dbcConfiguration. Below is the code for the same.

@org.springframework.context.annotation.Configuration
@ComponentScan("dev.tgarde.webflux")
@EnableWebFlux
@EnableR2dbcRepositories
public class DataBaseConfiguration extends AbstractR2dbcConfiguration {

  @Bean
  public ConnectionFactory connectionFactory() {
    ConnectionFactory connectionFactory = ConnectionFactories.get(
        "r2dbcs:mysql://localhost:3306/ExampleDB?"+
            "zeroDate=use_round&"+
            "sslMode=disabled");

    return connectionFactory;
  }
}

@EnableR2dbcRepositories Annotation is used activate reactive relational repositories using R2DBC.

Reactive Repository

ReactiveRepository are similar to JPA repository, it can be created by simple interface and extending ReactiveCrudRepository interface with Entity class name and primary key type.

public interface UserRepository extends ReactiveCrudRepository<User, Long> {

@Query("SELECT * FROM user WHERE firstname = :firstname")
Flux<User> findByFirstName(String firstname);
}

Now with above repository implementation we the only difference in it compared to JpaRepository is that the return type of the Interface is of type Reactive in this case Flux or Mono.

We can call above repository from our UserService and just use it the way we use JpaRepository.

@Autowired
private UserRepository userRepository;

@Override
public Flux<User> findUserByFirstName(String firstName) {
  return userRepository.findByFirstName(firstName);
}

So now we have completed the implementation of Non-Blocking Connection using R2DBC with data base with Service and Repository layer to use it.

You can find the latest code at Github . The link will open the commits for above code so that you can see what exact changes are done.

Vaccine Locator Service Using Spring WebFlux

Humble request 🙏🏻
if you are configuring this service on your machine please do not overwhelm the cowin server, keep the ping duration optimum, by default its hard coded to 20 minutes

Vaccine Locator is service that calls the cowin(co-vin) API and fetches the available slots (18+ only) for vaccine for current day only. if slots are available this service will send message on Configured Public Telegram channel.This application as of now fetches vaccine slots for only 1 configured district.

Pull request’s are open. If you are running the application for your district please update the README file here as well as application.yml so that if for your district anyone is running application you don’t have to run it just join telegram channel.

Configuration Required in application.yml file

  • District ID along with name in districts: all:
    • ex: pune district id is 363 so it is placed as pune: 363 under all:
  • Name of the district for which ID has been configured under cowin:
    • the same district you have to provide like selectedDistrict: pune
  • Telegram API Key in telegram: tApiKey:
  • Telegram channel name under telegram: tChannelName:

Telegram Channel Configuration

Please follwo link 1 and link 2 to create Telegram channel and get the API token from BotFather. Use the API key as mentioned above in application.yml file and Channel name from channel description (not the actual name)

Running Application

Once above configuration is done, run the below comands

mvn clean install
mvn spring-boot:run

GitHub Repository

Here is the link for GitHub repository, pull request for enhancement an bug fixes are welcome.

I will cover this application in our series of Spring WebFlux tutorial in upcoming posts.

Spring WebFlux REST Controller – Part-2

In order to understand Spring WebFlux more deeply we will implement a simple REST end-point for User. This User end-point as of now will have following REST action.

HTTP MethodURIResponse
GET/v1/usersUserResposne
GET Method

Creating Spring Boot WebFlux Application

So first we will have to create Spring WebFlux application. Its simple to stat with , just go here and fill up Project metadata and in dependencies use Spring Reactive Web. This will generate a folder with requires pom.xml and other Spring WebFlux dependencies . Once you download it , extract and import it in your favourite IDE . Make sure the pom.xml file has following dependency .

<dependency>
<groupId>org.springframework.boot</groupId>
<artifactId>spring-boot-starter-webflux</artifactId>
</dependency>

Creating REST Controller

All is set up for us to create Controller . But before writing controller code directly , let’s just first take a moment and understand what are the information we are going to need to implement the controller . So we already know few things , and these are

  • We need REST End Point for Users
  • We have to use HTTP GET Method
  • We Know Path/URI for this HTTP GET Method
  • We Know what to send in Response.

Now we need to implement above functionality in Spring WebFlux application, Spring provides annotation for all of the above requirement , we just have to implement it in correct way. So here are those annotation in Spring Reactive Web Provides

  • @RestController for REST End Point for Users
  • @GetMapping for HTTP GET Method
  • @RequestMapping for Path/URI for this HTTP GET Method
  • @ResponseBody to send in Response.

Lest understand what each of this annotation do.

@RestController

@RestController is composed annotation. It is composed of @Controller and @ResponseBody annotations. @Controller defines bean as controller whereas @ResponseBody indicates that every method this bean writes directly to the response body . The @RestController annotation is applied at the top of the class .

@GetMapping

@GetMapping annotation is type of request mapping annotation that gets invoked when GET HTTP method is called . We can also use @RequestMapping annotation here like this

@RequestMapping(method = RequestMethod.GET)

@RequestMapping

@RequestMapping annotation maps the incoming request for the given URI to the particular endpoint . In our case we need to point all the request (irrespective of HTTP Method) to our controller , so we will declare this annotation at top of the Controller class mentioning the URI.

@RequestMapping(USER_API_V1+SLASH+USERS)

where values in parenthesis is the URI in our case it is “/v1/users” indicating its version-1 of the API with endpoint “users”. The same @RequestMapping annotation can also be used along with HTTP method above functions to define the routing as mentioned above.

@ResposneBody

@ResposneBody annotation adds the return type of the method where it is declared to the repose body of the request. It is defined at the top of controller methods. In Simple word if the method is returning String , then response of that endpoint will be String.

With above annotations knowledge lets create a controller with String as @ResposneBody.

@RestController
@RequestMapping(USER_API_V1+SLASH+USERS)
public class UserController {
@GetMapping
public String getValue(){
return "Hello World";
}
}

If you run the Spring application with above controller we will get response in browser for GET HTTP call on http://localhost:8080/v1/users as “Hello World” .

Till now its exactly similar to how we do it in Spring MVC/Boot and we have not yet used any of the WebFlux feature, in order to use it , lets enhance the application and add Service layer for User and return UserResponse object.

@Service
public class UserServiceImpl implements UserService {
@Override
public Flux<UserResponse> getAllUsers() {
return Flux.fromIterable(generateUsers());
}

private List<UserResponse> generateUsers() {
return Arrays.asList(UserResponse.builder()
.userId(1)
.userName("User-1")
.build(),
UserResponse.builder()
.userId(2)
.userName("User-3")
.build(),
UserResponse.builder()
.userId(3)
.userName("User-3")
.build(),
UserResponse.builder()
.userId(4)
.userName("User-4")
.build());
}
}

Flux and Mono in Reactive Spring

As you can see we have UserServiceImpl class which has getAllUsers() method that Returns Flux<UserResposne>. Since we are returning the more than 1 entity in response we will have to use the Flux of that entity.

There are 2 Types of Publisher in Spring , Mono and Flux. Mono is a Publisher that produces 0 to 1 value . Flux is publisher that produces 0 to N values. As of now just keep in mind that we want to return more than 1 UserResposne entity we are using Flux. When we will use endpoint to get single entity of UserResposne that time we will use Mono. More on Flux and Mono in upcoming post.

Final Controller Code

@RestController
@RequestMapping(USER_API_V1+SLASH+USERS)
public class UserController {
@Autowired
private UserService userService;

@GetMapping
public Flux<UserResponse> getValue(){
return userService.getAllUsers();
}
}

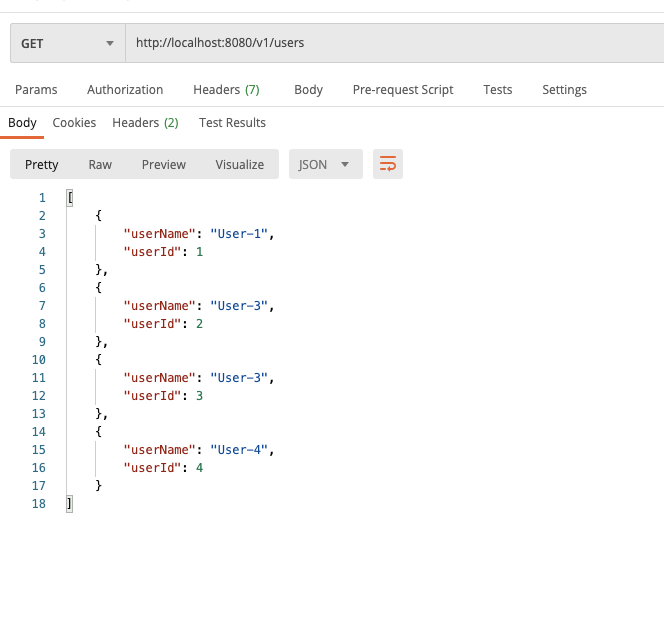
When you run this application using postman with url http://localhost:8080/v1/users the you should see the following response

GET Request Response

Now we are done with first part of Spring WebFlux tutorial. There are lot more things to learn and things are getting super exited, we have just started.

The Code for above you can find it here at GitHub.

Thank You 🙏

Why do you need Reactive Web Stack

Spring boot is great framework to build micro services . But what about building micro service based on reactive stack ? Well for this exact reason reactive stack web framework has been introduce in Spring 5.

Well why do we need reactive and what are the advantages of using reactive stack ?


Consider simple web app that receives request from web browser , do some operation with data base (GET or POST call) and returns a response to the browser. Whenever request comes to server it allocates thread to process the request . Now this same thread is then process the data received be it queryParam or POST form data . If there is a data base operation then there is data base query call to remote data base server and this threads waits for the response , once response is received from DB then thread returns it to web browser. Now this is generally followed and simplest explanation to request response based web application.
So do you see any problem with above application ? Let’s say in an ideal scenario there are no errors and our simple application can return a data to GET HTTP request by querying data base and we know for every request there is a thread allocation by server.

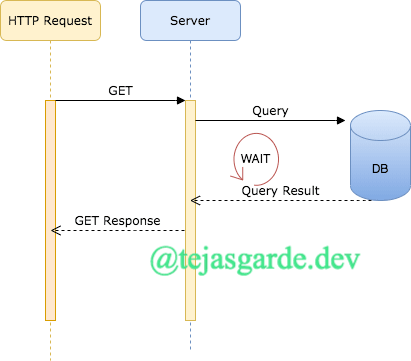
IMG-1 Blocking Request

As shown in diagram the GET request waits for the result from DB and then result is sent back. If this DB call takes lot of time the thread allocated to will certainly be blocked until the result is obtained or will throw request time out error .

Consider there are hundreds of such request to the server at same time, what will happen ? Server will allocate thread to each request but soon it will run out of those threads if the request are too many or beyond what is configured as max thread pool size for server. We can define it in spring boot by following property

server.tomcat.max-threads=100

For application if this size is not enough , we can increase it up to certain number or consider adding one more instance of application along with load balancer .

But what if consume the resources more efficiently. This is what exactly we will see now. There are may ways to effectively consume those threads, one of them we are covering here using reactive manner.

So in above example instead of waiting for the data base to respond what if thread get notified when result is received ? may be like call back ? This kind of behaviour is very common in Node js application, in-fact all node js application are written in callback manner because node js can perform only single threaded , non blocking async operations .But in java the basic JDBC drivers are blocking so to solve this we have R2DBC project which is developing drivers for multiple platform out of which we will cover My-SQL in upcomming posts . So drivers are resolved what about controller stack ? For controller we will use spring WebFlux . This both together will be our complete non-block web stack, note here that webflux uses Reactor Netty server. I urge you go and check the official documentation of Spring WebFlux it is very well written.

In Next blog post we will cover what is Spring WebFlux and try to implement controller layer to get our hand dirty with this exiting framework.

JPA 2 accessing data from multiple schemas

In Micro service architecture , we generally have a dedicated database schema for each service (though there are exceptions). Each service is then responsible for managing data from its data base and then taking to or responding to other micro services .

Now since we have different data bases schema the data access layer for each micro service is different . But that doesn’t mean data is not related. We can have entities that are related across schemas.

Consider below diagram , few micro services interacting with each other (service discover not shown for simplicity) . Data Aggregation Service interacts with three different data base schemas and processing it and sending over network or cloud service like SNS or SQS or simply sending it to any third party consumer.

Microservice interaction

This Data Aggregation service should be able to access data from multiple databases schemas as per requirement but with minimal data base trips. SQL query over multiple data bases schemas is possible with joins but what about data access layer ? We know when using ORM we can easily access related data from different tables when relations are defined in Entity classes or configuration depending on which implementation of JPA you are using . For example lets say for online shopping site we have Users table and Addresses table and they have one to many relation. So using JPA 2 Hibernate implementation i’ss quite simple to define this relation on Entity level and then extract Addresses using User we all know that very well.

Here is scenario, Let’s say we have micro-service-1 which handles users and address operation but another micro-service-2 handles reviews given by User and uses Reviews table .
A Separate micro-service-3 handles Products which can include Type of product , its manufacturer and lot more but for simplicity we will consider this service handles only one table as of now called products

There is requirement of another micro-service say data aggregation service which should fetch data from Users,Products and Reviews tables and push this data to cloud service for analytics .
Lets Start by creating schema , we are just crating micro-service-3 data access layer to understand how JPA can be used to access related data across the schema’s. For simpler explanation just assume micro-service-1 and micro-service-2 are populating their respective tables and our service has read-only access to those tables. We are populating tables with insert statements.
Create 3 schema’s product_service, user_service, review_service and run below sql queries.

-- products service data base tables
CREATE TABLE `product_service`.`products` (
	id bigint(20) NOT NULL AUTO_INCREMENT,
	name varchar(30) NOT NULL,
	manufacturer varchar(30) NOT NULL,
	type varchar(30) NOT NULL,
	PRIMARY KEY (id)
);

-- user service data base tables
CREATE TABLE `user_service`.`users` (
	id bigint(20) NOT NULL AUTO_INCREMENT,
	first_name VARCHAR(30) NOT NULL,
	last_name VARCHAR(30) NOT NULL,
	PRIMARY KEY (id)
);

CREATE TABLE `user_service`.`addresses` (
	id bigint(20) NOT NULL AUTO_INCREMENT,
	user_id bigint(20),
	street varchar(30) NOT NULL,
	city varchar(30) NOT NULL,
	state varchar(30) NOT NULL,
	PRIMARY KEY (id),
	FOREIGN KEY (user_id) REFERENCES users (id) ON DELETE CASCADE
);

-- reviews service data base tables
CREATE TABLE `review_service`.`reviews` (
id bigint(20) NOT NULL AUTO_INCREMENT,
user_id bigint(20),
content varchar(255),
published_date timestamp DEFAULT CURRENT_TIMESTAMP,
PRIMARY KEY (id)
);

-- Insert Data 
INSERT INTO `product_service`.`products` (name,manufacturer, type) 
values ('iPhone-11', 'Apple','mobile');
INSERT INTO `user_service`.`users` (first_name,last_name) 
values ('sherlock', 'holmes');
INSERT INTO `user_service`.`addresses` (user_id,street,city,state) 
values (1,'South Lake Avenue', 'Pasadena','CA');
INSERT INTO `review_service`.`reviews` (user_id,product_id,content) 
values (1,1,'best iPhone ever'); 

-- Check All Tabled 
select * from `product_service`.`products`;
select * from `user_service`.`users`;
select * from `user_service`.`addresses`;
select * from `review_service`.`reviews`;

--- Query to Fetch All Data for User including reviews
select product.name , product.manufacturer, user.first_name , user.last_name,
address.street, address.city, review.content, review.published_date
from `product_service`.`products` `product`
INNER JOIN `review_service`.`reviews` `review` ON `review`.`product_id`=`product`.`id`
INNER JOIN  `user_service`.`users`  user ON `user`.`id` = `review`.`user_id`
INNER JOIN  `user_service`.`addresses` `address` ON `address`.`user_id`=`user`.`id`
where user.id = 1; 

product_service schema has Products table that has details of each product. user_service schema has users and addresses and review_service has reviews tables containing reviews of the .

The last query in above section is our requirement. We need to fetch data from multiple schema with given userId and get result from all the tables mentioned below.
Since these schemas are different there is no direct JPA relation between them and that of the result we want instead we need to defined it . But first lets do some basics stuff.
We need pojo’s for the Tables, we also need EntityManager , TransactionManager for each schema and finally we need Repository classes .
All of this code is present at https://github.com/tejasgrd/jpa-multi-schema-access .
We will take example of each here for understanding rest of the code is on similar lines.

Users class with use of Lombok and javax.persistence annotations

@Entity
@Data
@AllArgsConstructor
@NoArgsConstructor
@Table(name = "users",schema = "users")
public class Users {
@Id
@Column(name = "id", nullable = false)
private long id;
@Column(name = "first_name")
private String firstName;
@Column(name = "last_name")
private String lastName;
@OneToMany(mappedBy = "user")
private Set<Addresses> addresses;
}

User repository interface

public interface UsersRepository extends JpaRepository<Users, Long> {
}

Users Database config

@Configuration
@EnableJpaRepositories(
basePackages = {"dev.tejasgarde.jpa.respository.users"},
entityManagerFactoryRef = "usersEntityManager",
transactionManagerRef = "usersTransactionManager")
public class UsersDBConfig extends BaseConfig{
@Bean
public JpaProperties usersJpaProperties() {
return getJpaProperties();
}

@Bean
@ConfigurationProperties("datasources.users")
public DataSourceProperties usersDataSourceProperties() {
return new DataSourceProperties();
}

@Bean
public LocalContainerEntityManagerFactoryBean usersEntityManager(
final JpaProperties usersJpaProperties) {
EntityManagerFactoryBuilder builder = createEntityManagerFactory(usersJpaProperties);
return builder.dataSource(usersDataSource()).packages("dev.tejasgarde.jpa.domain.users")
.persistenceUnit("usersDataSource").build();
}

@Bean
@ConfigurationProperties(prefix = "datasources.users.configurations")
public DataSource usersDataSource() {
DataSource dataSource = usersDataSourceProperties()
.initializeDataSourceBuilder()
.type(BasicDataSource.class).build();
return dataSource;
}

@Bean
public JpaTransactionManager usersTransactionManager(final JpaProperties usersJpaProperties) {
return new JpaTransactionManager(usersEntityManager(usersJpaProperties).getObject());
}
}

Now to run required query we have to run it as native query. We also have to map the result of the query to some object representing the variables equivalent to what we have in select query . So lets first create class representing what we have in select query ReviewsByUser.java

@Data
@AllArgsConstructor
@NoArgsConstructor
public class ReviewsByUser {
  String name;
  String manufacturer;
  String first_name;
  String last_name;
  String street;
  String city;
  String content;
  Date published_date;
}

These are all the fields which are part of select statement . Note that column names from select query and name of the variables are not the same but one thing we need to be careful here that the type of the variables should be exactly similar to what we have in Hibernate domain objects.

Let’s move ahead , now we need to define native query . How we define it and where we have to define it . So we usually define it on domain class and in this case we are going to define it in Products class. What else ? we also have to map the result to class we already defined for that we will have to use annotation and provide it class who’s object represent the result from query. So lets first get to know these annotations that we are going to define on Product class

NamedNativesQueries are defined with annotation as below , here we have only one.

@NamedNativeQueries({
      @NamedNativeQuery(
         name = "<name of query>",
         query = "<query goes here>",
         resultSetMapping= "<result set mapping>"
       )
})

To map the result of NamedNative queries we have to provide another annotation
@SqlResultSetMapping and below is the format for this

@SqlResultSetMappings({
        @SqlResultSetMapping(
             name="<result set mapping name>",
             classes = @ConstructorResult(
                      targetClass= <TargetClass>.class,
                      columns = {
                       @ColumnResult(name="name",type=<Type>.class ),
                       }
           ))
})

So Result from Native query are mapped using resultSetMapping and name , the resultSetMapping in @NamedNativeQuery should be same as that of name in @SqlResultSetMapping .
class is used to define class that represents the result from native query. Make sure that the class has constructor with the columns defined in e@ConstructorResult column .
Here is the complete Product class which has above two annotations.

@Entity
@Data
@AllArgsConstructor
@NoArgsConstructor
@Table(name = "products",schema = "products")
@NamedNativeQueries({
@NamedNativeQuery(
name = "Products.findReviewsByUser",
query ="select product.name , product.manufacturer, user.first_name , user.last_name,\n" +
"address.street,address.city, review.content, review.published_date\n" +
"from `product_service`.`products` `product`\n" +
"INNER JOIN `review_service`.`reviews` `review` ON `review`.`product_id`=`product`.`id`\n" +
"INNER JOIN `user_service`.`users` user ON `user`.`id` = `review`.`user_id`\n" +
"INNER JOIN `user_service`.`addresses` `address` ON `address`.`user_id`=`user`.`id`\n" +
"where user.id = ?1",
resultSetMapping = "reviewsByUser")
})
@SqlResultSetMappings({

@SqlResultSetMapping(
name = "reviewsByUser",
classes = @ConstructorResult(
targetClass = ReviewsByUser.class,
columns = {
@ColumnResult(name="name",type=String.class ),
@ColumnResult(name="manufacturer",type=String.class ),
@ColumnResult(name="first_name",type=String.class ),
@ColumnResult(name="last_name",type=String.class ),
@ColumnResult(name="street",type=String.class ),
@ColumnResult(name="city",type=String.class ),
@ColumnResult(name="content",type=String.class ),
@ColumnResult(name="published_date",type= Date.class )}))
})
public class Products {
@Id
@Column(name = "id", nullable = false)
private long id;
@Column(name = "name")
private String name;
@Column(name = "manufacturer")
private String manufacturer;
@Column(name = "type")
private String type;
}

Note how results are mapped using same name and @ConstuctorResult has columns defined with types .
Now there is still one step left here . As we are using repository we have to just define method in repository class and call it , JPA will call the invoke native query and return result .

@Repository
public interface ProductsRepository extends JpaRepository<Products, Long> {
@Transactional(timeout = 300)
@Query(nativeQuery = true)
List<ReviewsByUser> findReviewsByUser(Long userId)throws SQLException;;
}

Notice the name from @NamedNativeQuery and name of the method in repository are same and it has to be like this then only JPA will figure out which @NamedNativeQuery to invoke. Below is result from PostMan . We have just added @Controller which calls this method on GET request.

Hope this would make your understanding for JPA even better . Thank you for reading
Code is available at : https://github.com/tejasgrd/jpa-multi-schema-access