Akka Streams – Part 2 – Scan, Zip, ZipWith Operations

In our last blog post here we saw what are Akka stream , how they are initiated, what is Source etc. a very basic introduction. In this post we will go further ahead and check what are some basic operations we can do with stream flow.

Scan Operation

Scan operation can be used to performa user specific operation over the stream of Integers who’s sequence we defined in Source

public Source<Integer, NotUsed> getIntegerRangeSource(){
return Source.range(1, 10);
}

The Scan operation over Source takes 2 arguments first is the initial value of the operation or computation we want to perform and second is function. This function takes 2 arguments first is accumulator which we will carry forward to next operation , second is next element from our stream and function that performs the computation. Who’s result is added to accumulator. Syntax for this is

public <T> Source<T, Mat> scan(final T zero, final Function2<T, Out, T> f)

Here is the Example to perform the addition operation over all the elements from the Source Stream.

Source<BigInteger, NotUsed> addition = source.scan(BigInteger.ZERO,
        (accumulator, next) -> acc.add(BigInteger.valueOf(next)));

.scan() function takes BigInt Zero as first argument and function tat performs addition of the 2 integers.

How Computation happens here.

The Source stream is from 1 to 10 . The initial value of the Scan Operation is 0 (zero). So on the first function call would have output

0(accumulator) + 1(next) -> 1 (assigned to accumulator)

Since this is stream operation the Next value would be 2 and accumulator value is already 1 so the result would be 3 which is assigned to accumulator. In this way the remaining operations are as follows

1(accumulator) + 2(next) -> 3(assigned to accumulator)
3(accumulator) + 3(next) -> 6(assigned to accumulator)
6(accumulator) + 4(next) -> 10(assigned to accumulator)
10(accumulator) + 5(next) -> 15(assigned to accumulator)

In this way the computation will continue till the Source Stream reached its end at 10.

Of Course as this is Stream operation we will have to to use runWith() to sink the stream , and we can use map() to print our results in sequence.

public void addingStreamValues() {
    Source<Integer, NotUsed> source = getIntegerRangeSource();
    Source<BigInteger, NotUsed> addition = source.scan(BigInteger.ZERO,
            (accumulator, next) -> accumulator.add(BigInteger.valueOf(next)));
    addition
            .map(val -> {
                System.out.println(val);
                return val;
            })
            .runWith(Sink.seq(), actorSystem);
}

Factorial in Akka Streams Using Scan Operation

As we have seen in previous example the the addition of the numbers is performed using only one initial value which is 0 and all the elements of the stream. Now Instead of doing addition if we perform multiplication that would be factorial operation. Now only difference is instead of keeping initial accumulator value as 0 we will keep it 1 .

public void factorialInStream() {
Source<Integer, NotUsed> source = getIntegerRangeSource();
Source<BigInteger, NotUsed> multiplication = source
.take(5)
.scan(BigInteger.ONE,
(accumulator, next) -> accumulator.multiply(BigInteger.valueOf(next)));

multiplication
.map(val -> {
System.out.println(val);
return val;
})
.runWith(Sink.seq(), actorSystem);
}

Here we have taken only first 5 elements from the Source Stream and perform operations on those only and result is printed.

Zip Operation

Zip operation is used to combine two Streams using Pair. Consider we have 2 Streams one is from Range 1 to 10 and another is of Range 11 to 20 . The Zip operation will perform on Source 1 and Source 2 will result into Pairing Each element from each Stream to another like this.

public void zipOperation(){
    Source<Integer, NotUsed> source = getIntegerRangeSource();
    Source<Integer, NotUsed> source2 = getIntegerRangeSource2();
    source
            .zip(source2)
            .map(val -> {
               System.out.println(val);
               return val;
            })
            .runWith(Sink.seq(), actorSystem);

}

Output of the above code is

Pair(1,11)
Pair(2,12)
Pair(3,13)
Pair(4,14)
Pair(5,15)
Pair(6,16)
Pair(7,17)
Pair(8,18)
Pair(9,19)
Pair(10,20)

The Pair Object is from Akka Actor library , and each element from this Zip operation can be accessed using this Pair object.

One thing to notice here this operation will be performed only till the number of elements from both streams are equal , that means if the source 2 has 15 elements then for remaining 5 elements which does not pair with source 1 will be skipped as source 1 has only 10 elements.
If you want to perform Zip operation even if the stream elements wont match then use ZipAll function like below

public void zipAllOperation(){
Source<Integer, NotUsed> source = getIntegerRangeSource();
Source<Integer, NotUsed> source2 = getIntegerRangeSource2();

source
.zipAll(source2, -1 , 0)
.map(val -> {
val.first();
System.out.println(val);
return val;})
.runWith(Sink.seq(), actorSystem);

}

output will be

Pair(1,11)
Pair(2,12)
Pair(3,13)
Pair(4,14)
Pair(5,15)
Pair(6,16)
Pair(7,17)
Pair(8,18)
Pair(9,19)
Pair(10,20)
Pair(-1,21)
Pair(-1,22)
Pair(-1,23)
Pair(-1,24)
Pair(-1,25)

Here you can see when source 1 does not match with any element it prints as -1 which we have given in

.zipAll(source2, -1 , 0)

ZipWith Operation

ZipWith function is used to combine 2 streams with function that performs operations on this elements.

public void zipWithOperation(){
Source<Integer, NotUsed> source = getIntegerRangeSource();
Source<Integer, NotUsed> source2 = getIntegerRangeSource2();

source
.zipWith(source2, (elem1, elem2) -> elem1*elem2)
.map(val -> {
System.out.println(val);
return val;})
.runWith(Sink.seq(), actorSystem);

}

Here is above code sample we have performed ZipWith using multiplication operation. Please note in this case as well just like Zip function the elements that does not have any corresponding element in another stream wont be called.

Conclusion

In this blog post we saw some more useful operations that we can do using akka streams also we saw one simple use case of calculating Factorial using the Akka Stream. You can check all code form this blog alone here on github.

Vaccine Locator Service Using Spring WebFlux

Humble request 🙏🏻
if you are configuring this service on your machine please do not overwhelm the cowin server, keep the ping duration optimum, by default its hard coded to 20 minutes

Vaccine Locator is service that calls the cowin(co-vin) API and fetches the available slots (18+ only) for vaccine for current day only. if slots are available this service will send message on Configured Public Telegram channel.This application as of now fetches vaccine slots for only 1 configured district.

Pull request’s are open. If you are running the application for your district please update the README file here as well as application.yml so that if for your district anyone is running application you don’t have to run it just join telegram channel.

Configuration Required in application.yml file

  • District ID along with name in districts: all:
    • ex: pune district id is 363 so it is placed as pune: 363 under all:
  • Name of the district for which ID has been configured under cowin:
    • the same district you have to provide like selectedDistrict: pune
  • Telegram API Key in telegram: tApiKey:
  • Telegram channel name under telegram: tChannelName:

Telegram Channel Configuration

Please follwo link 1 and link 2 to create Telegram channel and get the API token from BotFather. Use the API key as mentioned above in application.yml file and Channel name from channel description (not the actual name)

Running Application

Once above configuration is done, run the below comands

mvn clean install
mvn spring-boot:run

GitHub Repository

Here is the link for GitHub repository, pull request for enhancement an bug fixes are welcome.

I will cover this application in our series of Spring WebFlux tutorial in upcoming posts.

JPA 2 accessing data from multiple schemas

In Micro service architecture , we generally have a dedicated database schema for each service (though there are exceptions). Each service is then responsible for managing data from its data base and then taking to or responding to other micro services .

Now since we have different data bases schema the data access layer for each micro service is different . But that doesn’t mean data is not related. We can have entities that are related across schemas.

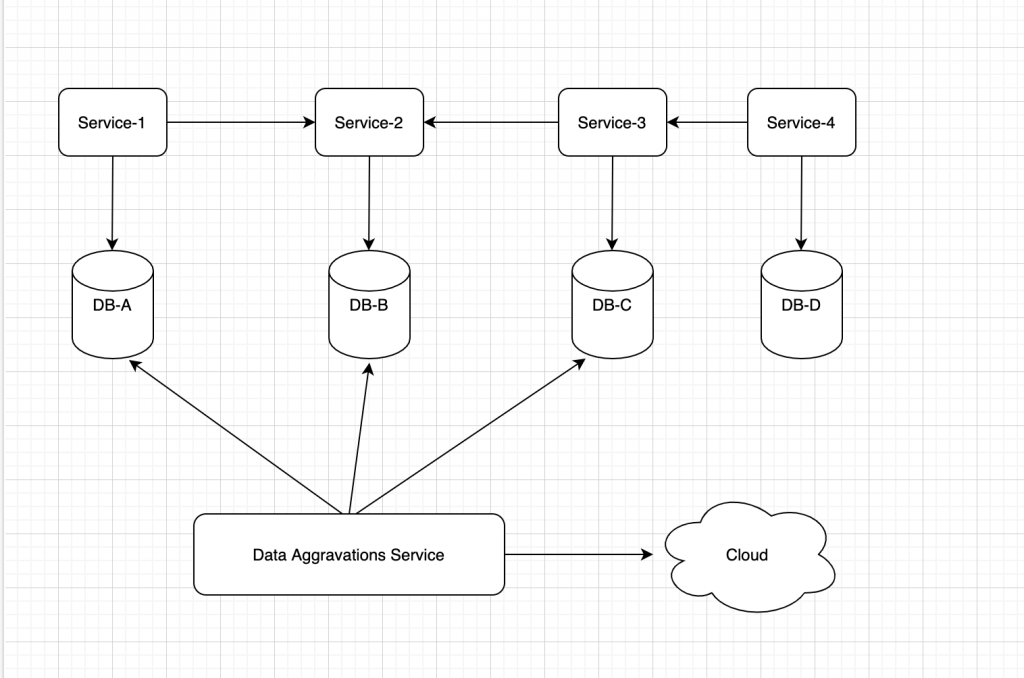
Consider below diagram , few micro services interacting with each other (service discover not shown for simplicity) . Data Aggregation Service interacts with three different data base schemas and processing it and sending over network or cloud service like SNS or SQS or simply sending it to any third party consumer.

Microservice interaction

This Data Aggregation service should be able to access data from multiple databases schemas as per requirement but with minimal data base trips. SQL query over multiple data bases schemas is possible with joins but what about data access layer ? We know when using ORM we can easily access related data from different tables when relations are defined in Entity classes or configuration depending on which implementation of JPA you are using . For example lets say for online shopping site we have Users table and Addresses table and they have one to many relation. So using JPA 2 Hibernate implementation i’ss quite simple to define this relation on Entity level and then extract Addresses using User we all know that very well.

Here is scenario, Let’s say we have micro-service-1 which handles users and address operation but another micro-service-2 handles reviews given by User and uses Reviews table .
A Separate micro-service-3 handles Products which can include Type of product , its manufacturer and lot more but for simplicity we will consider this service handles only one table as of now called products

There is requirement of another micro-service say data aggregation service which should fetch data from Users,Products and Reviews tables and push this data to cloud service for analytics .
Lets Start by creating schema , we are just crating micro-service-3 data access layer to understand how JPA can be used to access related data across the schema’s. For simpler explanation just assume micro-service-1 and micro-service-2 are populating their respective tables and our service has read-only access to those tables. We are populating tables with insert statements.
Create 3 schema’s product_service, user_service, review_service and run below sql queries.

-- products service data base tables
CREATE TABLE `product_service`.`products` (
	id bigint(20) NOT NULL AUTO_INCREMENT,
	name varchar(30) NOT NULL,
	manufacturer varchar(30) NOT NULL,
	type varchar(30) NOT NULL,
	PRIMARY KEY (id)
);

-- user service data base tables
CREATE TABLE `user_service`.`users` (
	id bigint(20) NOT NULL AUTO_INCREMENT,
	first_name VARCHAR(30) NOT NULL,
	last_name VARCHAR(30) NOT NULL,
	PRIMARY KEY (id)
);

CREATE TABLE `user_service`.`addresses` (
	id bigint(20) NOT NULL AUTO_INCREMENT,
	user_id bigint(20),
	street varchar(30) NOT NULL,
	city varchar(30) NOT NULL,
	state varchar(30) NOT NULL,
	PRIMARY KEY (id),
	FOREIGN KEY (user_id) REFERENCES users (id) ON DELETE CASCADE
);

-- reviews service data base tables
CREATE TABLE `review_service`.`reviews` (
id bigint(20) NOT NULL AUTO_INCREMENT,
user_id bigint(20),
content varchar(255),
published_date timestamp DEFAULT CURRENT_TIMESTAMP,
PRIMARY KEY (id)
);

-- Insert Data 
INSERT INTO `product_service`.`products` (name,manufacturer, type) 
values ('iPhone-11', 'Apple','mobile');
INSERT INTO `user_service`.`users` (first_name,last_name) 
values ('sherlock', 'holmes');
INSERT INTO `user_service`.`addresses` (user_id,street,city,state) 
values (1,'South Lake Avenue', 'Pasadena','CA');
INSERT INTO `review_service`.`reviews` (user_id,product_id,content) 
values (1,1,'best iPhone ever'); 

-- Check All Tabled 
select * from `product_service`.`products`;
select * from `user_service`.`users`;
select * from `user_service`.`addresses`;
select * from `review_service`.`reviews`;

--- Query to Fetch All Data for User including reviews
select product.name , product.manufacturer, user.first_name , user.last_name,
address.street, address.city, review.content, review.published_date
from `product_service`.`products` `product`
INNER JOIN `review_service`.`reviews` `review` ON `review`.`product_id`=`product`.`id`
INNER JOIN  `user_service`.`users`  user ON `user`.`id` = `review`.`user_id`
INNER JOIN  `user_service`.`addresses` `address` ON `address`.`user_id`=`user`.`id`
where user.id = 1; 

product_service schema has Products table that has details of each product. user_service schema has users and addresses and review_service has reviews tables containing reviews of the .

The last query in above section is our requirement. We need to fetch data from multiple schema with given userId and get result from all the tables mentioned below.
Since these schemas are different there is no direct JPA relation between them and that of the result we want instead we need to defined it . But first lets do some basics stuff.
We need pojo’s for the Tables, we also need EntityManager , TransactionManager for each schema and finally we need Repository classes .
All of this code is present at https://github.com/tejasgrd/jpa-multi-schema-access .
We will take example of each here for understanding rest of the code is on similar lines.

Users class with use of Lombok and javax.persistence annotations

@Entity
@Data
@AllArgsConstructor
@NoArgsConstructor
@Table(name = "users",schema = "users")
public class Users {
@Id
@Column(name = "id", nullable = false)
private long id;
@Column(name = "first_name")
private String firstName;
@Column(name = "last_name")
private String lastName;
@OneToMany(mappedBy = "user")
private Set<Addresses> addresses;
}

User repository interface

public interface UsersRepository extends JpaRepository<Users, Long> {
}

Users Database config

@Configuration
@EnableJpaRepositories(
basePackages = {"dev.tejasgarde.jpa.respository.users"},
entityManagerFactoryRef = "usersEntityManager",
transactionManagerRef = "usersTransactionManager")
public class UsersDBConfig extends BaseConfig{
@Bean
public JpaProperties usersJpaProperties() {
return getJpaProperties();
}

@Bean
@ConfigurationProperties("datasources.users")
public DataSourceProperties usersDataSourceProperties() {
return new DataSourceProperties();
}

@Bean
public LocalContainerEntityManagerFactoryBean usersEntityManager(
final JpaProperties usersJpaProperties) {
EntityManagerFactoryBuilder builder = createEntityManagerFactory(usersJpaProperties);
return builder.dataSource(usersDataSource()).packages("dev.tejasgarde.jpa.domain.users")
.persistenceUnit("usersDataSource").build();
}

@Bean
@ConfigurationProperties(prefix = "datasources.users.configurations")
public DataSource usersDataSource() {
DataSource dataSource = usersDataSourceProperties()
.initializeDataSourceBuilder()
.type(BasicDataSource.class).build();
return dataSource;
}

@Bean
public JpaTransactionManager usersTransactionManager(final JpaProperties usersJpaProperties) {
return new JpaTransactionManager(usersEntityManager(usersJpaProperties).getObject());
}
}

Now to run required query we have to run it as native query. We also have to map the result of the query to some object representing the variables equivalent to what we have in select query . So lets first create class representing what we have in select query ReviewsByUser.java

@Data
@AllArgsConstructor
@NoArgsConstructor
public class ReviewsByUser {
  String name;
  String manufacturer;
  String first_name;
  String last_name;
  String street;
  String city;
  String content;
  Date published_date;
}

These are all the fields which are part of select statement . Note that column names from select query and name of the variables are not the same but one thing we need to be careful here that the type of the variables should be exactly similar to what we have in Hibernate domain objects.

Let’s move ahead , now we need to define native query . How we define it and where we have to define it . So we usually define it on domain class and in this case we are going to define it in Products class. What else ? we also have to map the result to class we already defined for that we will have to use annotation and provide it class who’s object represent the result from query. So lets first get to know these annotations that we are going to define on Product class

NamedNativesQueries are defined with annotation as below , here we have only one.

@NamedNativeQueries({
      @NamedNativeQuery(
         name = "<name of query>",
         query = "<query goes here>",
         resultSetMapping= "<result set mapping>"
       )
})

To map the result of NamedNative queries we have to provide another annotation
@SqlResultSetMapping and below is the format for this

@SqlResultSetMappings({
        @SqlResultSetMapping(
             name="<result set mapping name>",
             classes = @ConstructorResult(
                      targetClass= <TargetClass>.class,
                      columns = {
                       @ColumnResult(name="name",type=<Type>.class ),
                       }
           ))
})

So Result from Native query are mapped using resultSetMapping and name , the resultSetMapping in @NamedNativeQuery should be same as that of name in @SqlResultSetMapping .
class is used to define class that represents the result from native query. Make sure that the class has constructor with the columns defined in e@ConstructorResult column .
Here is the complete Product class which has above two annotations.

@Entity
@Data
@AllArgsConstructor
@NoArgsConstructor
@Table(name = "products",schema = "products")
@NamedNativeQueries({
@NamedNativeQuery(
name = "Products.findReviewsByUser",
query ="select product.name , product.manufacturer, user.first_name , user.last_name,\n" +
"address.street,address.city, review.content, review.published_date\n" +
"from `product_service`.`products` `product`\n" +
"INNER JOIN `review_service`.`reviews` `review` ON `review`.`product_id`=`product`.`id`\n" +
"INNER JOIN `user_service`.`users` user ON `user`.`id` = `review`.`user_id`\n" +
"INNER JOIN `user_service`.`addresses` `address` ON `address`.`user_id`=`user`.`id`\n" +
"where user.id = ?1",
resultSetMapping = "reviewsByUser")
})
@SqlResultSetMappings({

@SqlResultSetMapping(
name = "reviewsByUser",
classes = @ConstructorResult(
targetClass = ReviewsByUser.class,
columns = {
@ColumnResult(name="name",type=String.class ),
@ColumnResult(name="manufacturer",type=String.class ),
@ColumnResult(name="first_name",type=String.class ),
@ColumnResult(name="last_name",type=String.class ),
@ColumnResult(name="street",type=String.class ),
@ColumnResult(name="city",type=String.class ),
@ColumnResult(name="content",type=String.class ),
@ColumnResult(name="published_date",type= Date.class )}))
})
public class Products {
@Id
@Column(name = "id", nullable = false)
private long id;
@Column(name = "name")
private String name;
@Column(name = "manufacturer")
private String manufacturer;
@Column(name = "type")
private String type;
}

Note how results are mapped using same name and @ConstuctorResult has columns defined with types .
Now there is still one step left here . As we are using repository we have to just define method in repository class and call it , JPA will call the invoke native query and return result .

@Repository
public interface ProductsRepository extends JpaRepository<Products, Long> {
@Transactional(timeout = 300)
@Query(nativeQuery = true)
List<ReviewsByUser> findReviewsByUser(Long userId)throws SQLException;;
}

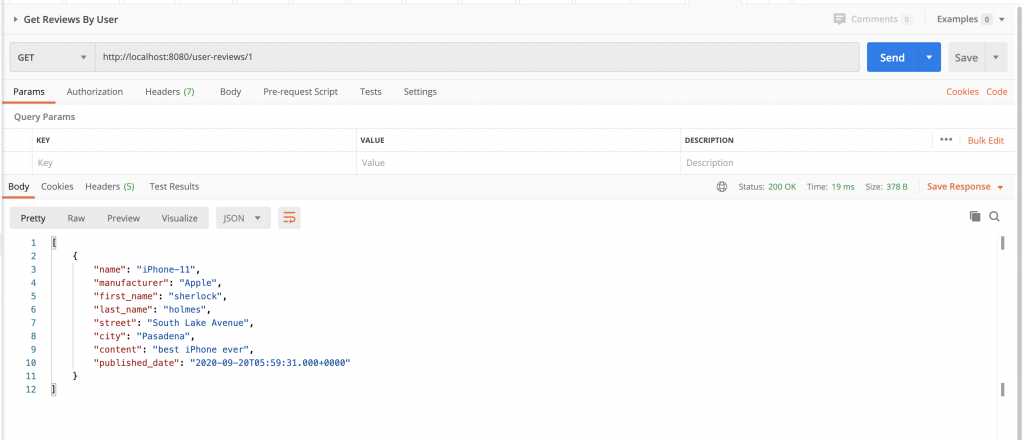
Notice the name from @NamedNativeQuery and name of the method in repository are same and it has to be like this then only JPA will figure out which @NamedNativeQuery to invoke. Below is result from PostMan . We have just added @Controller which calls this method on GET request.

Hope this would make your understanding for JPA even better . Thank you for reading
Code is available at : https://github.com/tejasgrd/jpa-multi-schema-access